- Recently I decided to professionalize this newly minted, in-development blog (I haven’t even customize the theme yet). I sunk a good one hour into fiddling with DNS configuration because it’s not very obvious to me how the whole system work. Configuring namecheap.com isn’t exactly easy so I figure I’d save everybody’s time with a blog post.
These instructions are only applicable to github pages.
Steps
1. Buy a domain
Buying domain is probably the easiest? Here’s a couple of vendors.
- ionos.com - Typically have a $1 intro fee for the first year.
- namecheap.com - 50-90% off of the first year. For my deal, the annual fee before discount is also cheaper than other competitor.
- cloudflair.com
- vercel.net
- godaddy, which is more expensive in my experience.
I decided to go with namecheap because the annual fee for this domain is only $15, and for the first year it’s 50% off.
2. Configure github domain verification.
Assuming you have access to your DNS configuration on the vendor’s system:
-
Go into your Github account Page setting
-
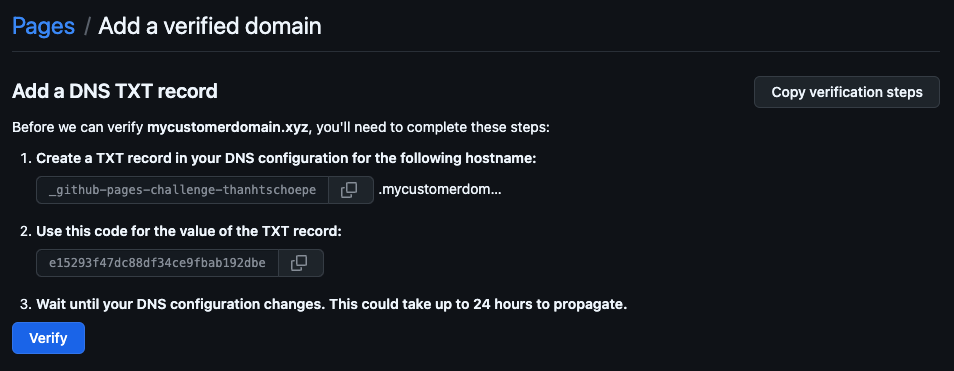
Click “Add a domain”.
-
Follow the instruction. For example I am using a bogus domain here that I do not own.

After verification is complete, we can move on to step 3.3814
3. Configure Other DNS.
You may have seen that there are tons of record type from step 2. Here’s a quick recap on what they are.
- A Record: Maps a domain directly to IP addresses. Used for the root domain (“apex domain”).
- CNAME Record: Maps a subdomain to another domain name. Cannot be used for the root domain.
- TXT Record: Stores text-based information, often used for domain verification.
1. Add GitHub Pages IP Addresses
Add these records to your DNS registar.
| Type | Host | Value | Comment |
|---|---|---|---|
| A | @ | 185.199.108.153 | |
| A | @ | 185.199.109.153 | |
| A | @ | 185.199.110.153 | |
| A | @ | 185.199.111.153 | Must add all four IP to work |
| CNAME | www | <username>.github.io | username is your account name. |
| CNAME | <subdomain> | <username>.github.io | Optional, if you want subdomain like blog.mydomain.com to also work. |
2. Repository Configuration
- Go to your GitHub repository
- Navigate to Settings > Pages
- Under “Custom domain”, enter your domain name
- Save the changes
- Create a CNAME file in your repository root with your custom domain
Example CNAME file if your domain is mydomain.com
// file: CNAME
mydomain.com
You’re done!
Now wait 30 minutes for the change to propagate. You should be able to see your blog come online in the browser!

I hope this blog is useful for you!
